Paint Overview
Paint 是 tgfx 中控制"画出来长什么样"的核心配置对象。它定义了绘制操作的外观、样式和后处理效果,围绕效果管线展开。本文档介绍 Paint 的完整使用方法,帮助开发者理解如何配置颜色、描边、滤镜等渲染属性。
1. Paint 的组成
Paint 由三大核心组件构成,分别控制渲染管线的不同阶段:
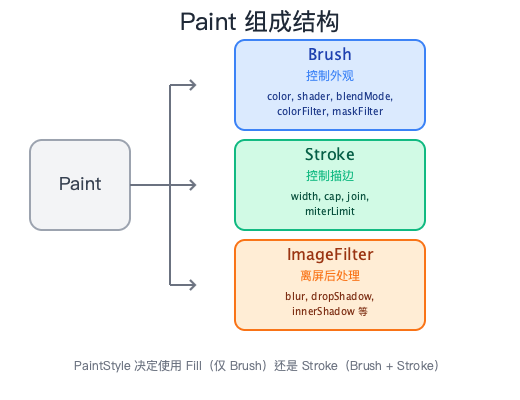
| 组件 | 职责 | 主要属性 |
|---|---|---|
| Brush | 控制外观(颜色、着色器、混合模式、滤镜) | color, shader, blendMode, colorFilter, maskFilter |
| Stroke | 控制描边参数(仅在描边模式下生效) | width, cap, join, miterLimit |
| ImageFilter | 离屏后处理(模糊、阴影等,需离屏渲染) | blur, dropShadow, innerShadow 等 |
1.1 代码结构
class Paint {
 private:
  Brush brush = {};                           // 外观属性
  Stroke stroke = {};                         // 描边参数
  std::shared_ptr<ImageFilter> imageFilter;   // 离屏后处理
  PaintStyle style = PaintStyle::Fill;        // 填充或描边
};
1.2 基本使用
int main() {
    Paint paint;

    // 设置颜色(通过 Brush)
    paint.setColor(Color::Red());

    // 设置描边模式
    paint.setStyle(PaintStyle::Stroke);
    paint.setStrokeWidth(3.0f);

    // 设置后处理滤镜
    paint.setImageFilter(ImageFilter::Blur(5.0f, 5.0f));

    canvas->drawRect(Rect::MakeXYWH(50, 50, 200, 150), paint);
}
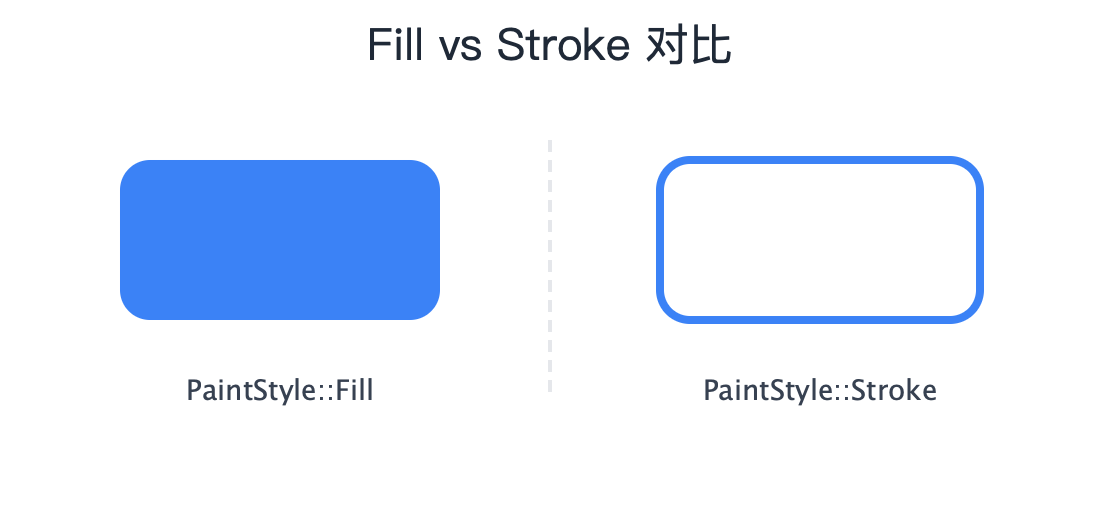
2. 填充 vs 描边
Paint 通过 PaintStyle 枚举控制几何图形的渲染模式:
| 模式 | 说明 |
|---|---|
PaintStyle::Fill | 填充模式,使用 Brush 属性填充图形内部(默认) |
PaintStyle::Stroke | 描边模式,使用 Brush 属性 + Stroke 参数绘制图形轮廓 |
2.1 代码示例
int main() {
    Rect rect = Rect::MakeXYWH(50, 50, 200, 100);

    // 填充模式
    Paint fillPaint;
    fillPaint.setColor(Color::Blue());
    fillPaint.setStyle(PaintStyle::Fill);  // 默认值,可省略
    canvas->drawRoundRect(rect, 15, 15, fillPaint);

    // 描边模式
    Paint strokePaint;
    strokePaint.setColor(Color::Blue());
    strokePaint.setStyle(PaintStyle::Stroke);
    strokePaint.setStrokeWidth(4.0f);
    canvas->drawRoundRect(Rect::MakeXYWH(300, 50, 200, 100), 15, 15, strokePaint);
}
3. 颜色
tgfx 使用 Color 类表示颜色,基于 RGBA 四通道浮点数。
3.1 Color 基础
| 特性 | 说明 |
|---|---|
| 数据类型 | 四个 float 分量:red, green, blue, alpha |
| 取值范围 | 0.0 ~ 1.0 |
| Alpha 类型 | 非预乘(Unpremultiplied) |
3.2 创建颜色
Color 提供多种创建方式:
方式一:使用预定义颜色
tgfx 提供了常用颜色的静态方法,如 White()、Black()、Red()、Transparent() 等。
Color white = Color::White();
Color red = Color::Red();
Color transparent = Color::Transparent();
方式二:直接构造(浮点 RGBA)
通过四个浮点数直接构造颜色,值可以超出 0~1 范围以支持 HDR。
Color custom(0.2f, 0.5f, 0.8f, 1.0f);
Color hdr(1.5f, 1.2f, 0.8f, 1.0f);
方式三:从 8-bit 值创建
使用 FromRGBA() 从传统的 0~255 整数值创建,内部会自动转换为浮点数。
Color fromBytes = Color::FromRGBA(255, 128, 64, 255);
方式四:从 8-bit 值 + 色彩空间创建
可以指定色彩空间进行转换。
auto colorSpace = ColorSpace::MakeSRGB();
Color withSpace = Color::FromRGBA(200, 100, 50, 255, colorSpace);
3.3 预乘与非预乘
Color 默认是非预乘(Unpremultiplied)格式,即 RGB 与 Alpha 独立存储。可通过 premultiply() 转换为预乘格式(RGB 乘以 Alpha),也可通过 unpremultiply() 转回非预乘。
Color color(1.0f, 0.5f, 0.0f, 0.5f);  // 半透明橙色
PMColor pmColor = color.premultiply();  // 预乘后: (0.5, 0.25, 0.0, 0.5)
Color unpremultiplied = pmColor.unpremultiply();  // 转回: (1.0, 0.5, 0.0, 0.5)
注意:Paint 中设置的颜色始终使用非预乘格式。预乘转换通常在渲染管线内部自动处理。
3.4 颜色操作
Paint 提供 setColor() / getColor() 设置和获取颜色,以及 setAlpha() / getAlpha() 单独操作透明度。
Color 类也提供便捷方法:isOpaque() 判断是否不透明,makeOpaque() 返回 alpha 为 1.0 的副本。
Paint paint;
paint.setColor(Color::Red());
paint.setAlpha(0.5f);  // 设置半透明

Color c(0.5f, 0.5f, 0.5f, 0.8f);
bool opaque = c.isOpaque();  // false
Color opaqueColor = c.makeOpaque();  // alpha 变为 1.0
4. Stroke 描边参数
当 PaintStyle 设为 Stroke 时,Stroke 类的参数决定描边的外观。
4.1 参数一览
| 参数 | 类型 | 默认值 | 说明 |
|---|---|---|---|
width | float | 1.0 | 描边线宽(0 表示 hairline,最细线) |
cap | LineCap | Butt | 线段端点样式 |
join | LineJoin | Miter | 线段连接处样式 |
miterLimit | float | 4.0 | Miter 连接的尖角限制 |
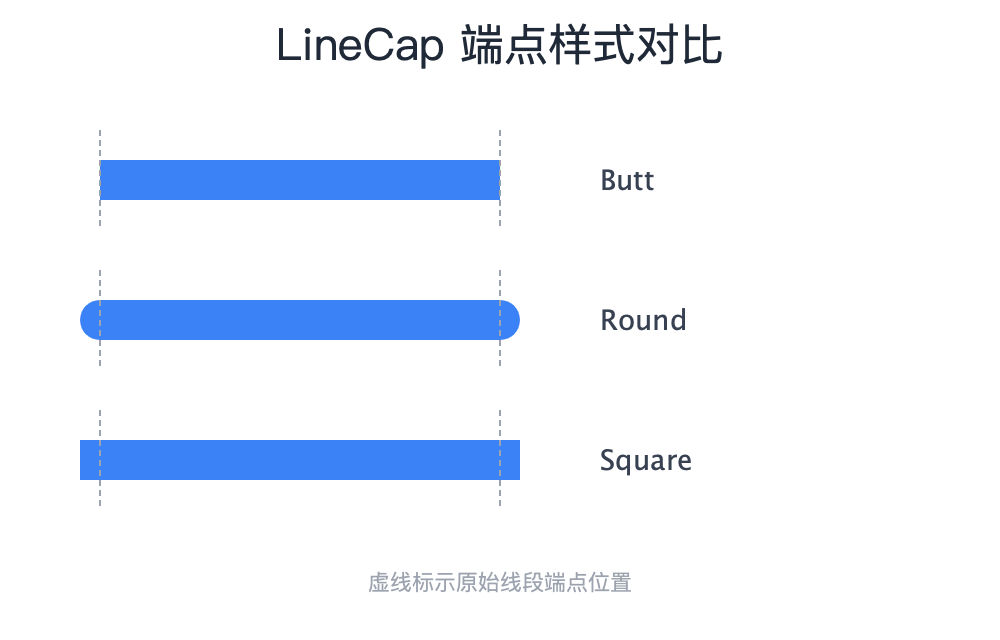
4.2 LineCap 端点样式
LineCap 控制开放路径端点的绘制方式:
| 值 | 说明 |
|---|---|
LineCap::Butt | 无延伸,线段在端点处平齐截断(默认) |
LineCap::Round | 端点添加半圆,直径等于线宽 |
LineCap::Square | 端点向外延伸半个线宽的方形(宽度等于线宽,长度等于线宽的一半) |
int main() {
    Paint paint;
    paint.setStyle(PaintStyle::Stroke);
    paint.setStrokeWidth(20.0f);

    // Butt(默认)
    paint.setLineCap(LineCap::Butt);
    canvas->drawLine(50, 50, 250, 50, paint);

    // Round
    paint.setLineCap(LineCap::Round);
    canvas->drawLine(50, 100, 250, 100, paint);

    // Square
    paint.setLineCap(LineCap::Square);
    canvas->drawLine(50, 150, 250, 150, paint);
}
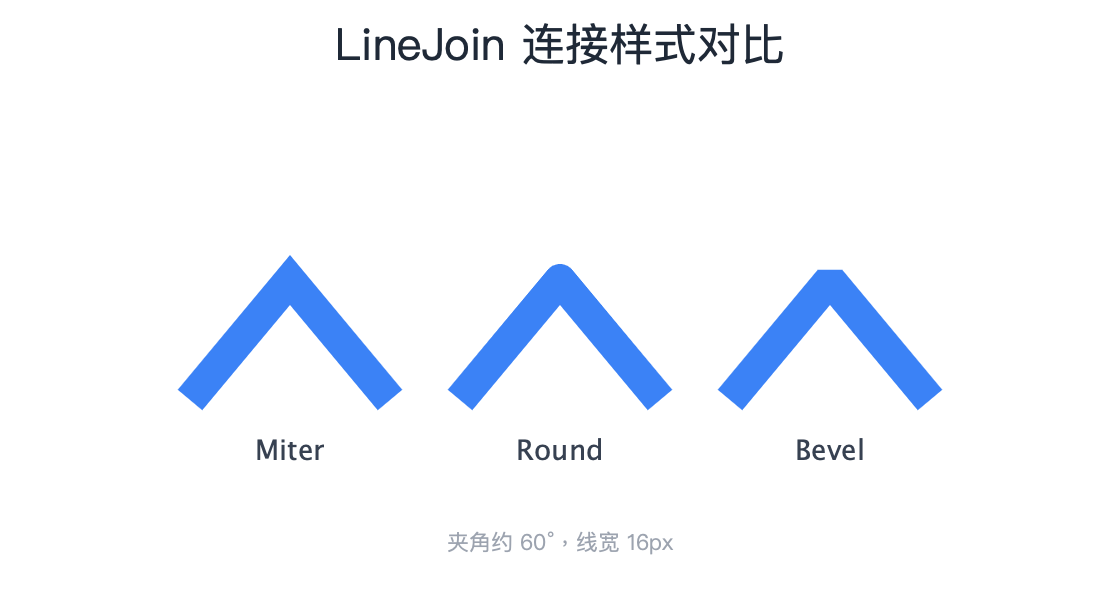
4.3 LineJoin 连接样式
LineJoin 控制路径中线段连接处的绘制方式:
| 值 | 说明 |
|---|---|
LineJoin::Miter | 尖角连接,延伸至交点(默认) |
LineJoin::Round | 圆角连接,添加圆弧 |
LineJoin::Bevel | 斜角连接,用直线截断 |
int main() {
    Paint paint;
    paint.setStyle(PaintStyle::Stroke);
    paint.setStrokeWidth(20.0f);

    Path path;
    path.moveTo(50, 150);
    path.lineTo(100, 50);
    path.lineTo(150, 150);

    // Miter(默认)
    paint.setLineJoin(LineJoin::Miter);
    canvas->drawPath(path, paint);

    // Round
    paint.setLineJoin(LineJoin::Round);
    canvas->save();
    canvas->translate(150, 0);
    canvas->drawPath(path, paint);
    canvas->restore();

    // Bevel
    paint.setLineJoin(LineJoin::Bevel);
    canvas->save();
    canvas->translate(300, 0);
    canvas->drawPath(path, paint);
    canvas->restore();
}
4.4 MiterLimit 尖角限制
当使用 LineJoin::Miter 时,如果两线段夹角很小,尖角会延伸得很长。miterLimit 用于限制这种延伸:
- 当尖角长度 / 线宽 > miterLimit 时,自动退化为 Bevel 连接
- 默认值 4.0 对应约 29° 的最小夹角
int main() {
    Paint paint;
    paint.setStyle(PaintStyle::Stroke);
    paint.setStrokeWidth(10.0f);
    paint.setLineJoin(LineJoin::Miter);

    // 小夹角路径
    Path sharpPath;
    sharpPath.moveTo(50, 100);
    sharpPath.lineTo(150, 50);
    sharpPath.lineTo(250, 100);

    // miterLimit = 4.0(默认),小夹角退化为 Bevel
    paint.setMiterLimit(4.0f);
    canvas->drawPath(sharpPath, paint);

    // miterLimit = 10.0,允许更尖的角
    paint.setMiterLimit(10.0f);
    canvas->save();
    canvas->translate(0, 100);
    canvas->drawPath(sharpPath, paint);
    canvas->restore();
}
4.5 整体设置 Stroke
除了逐个设置参数,也可以通过 Stroke 构造函数一次性创建完整配置,然后用 setStroke() 设置到 Paint。
构造函数参数顺序:Stroke(width, cap, join, miterLimit)
Stroke stroke(5.0f, LineCap::Round, LineJoin::Round, 4.0f);

Paint paint;
paint.setStyle(PaintStyle::Stroke);
paint.setStroke(stroke);
canvas->drawPath(path, paint);
5. 抗锯齿
抗锯齿(Anti-Aliasing)通过在边缘像素上应用半透明过渡来平滑锯齿状边缘。
5.1 开关控制
| 方法 | 说明 |
|---|---|
isAntiAlias() | 获取当前抗锯齿状态(默认 true) |
setAntiAlias(bool) | 设置抗锯齿开关 |

5.2 代码示例
以下示例绘制两条斜线,分别展示抗锯齿开启和关闭的效果:
Paint paint;
paint.setColor(Color::Black());
paint.setStyle(PaintStyle::Stroke);
paint.setStrokeWidth(2.0f);

paint.setAntiAlias(true);  // 抗锯齿开启(默认)
canvas->drawLine(50, 50, 250, 150, paint);

paint.setAntiAlias(false);  // 抗锯齿关闭
canvas->drawLine(50, 100, 250, 200, paint);
性能提示:抗锯齿会增加少量渲染开销。对于轴对齐的矩形或水平/垂直线段,关闭抗锯齿可获得更清晰的像素对齐效果。
6. 效果系统总览
tgfx 提供六种可挂载的效果,用于实现丰富的视觉表现。它们作用于渲染管线的不同阶段:
| 效果类型 | 作用阶段 | 说明 | 详细文档 |
|---|---|---|---|
| Shader | 颜色生成 | 生成源颜色,如渐变、图像纹理、纯色 | Shader 使用指南 |
| ColorFilter | 颜色变换 | 对颜色进行矩阵变换、混合、亮度提取等处理 | ColorFilter 使用指南 |
| MaskFilter | Alpha 调制 | 对绘制内容的 Alpha 通道进行调制,常用于渐变蒙版 | MaskFilter 使用指南 |
| ImageFilter | 离屏后处理 | 对整个绘制结果进行模糊、阴影等后处理 | ImageFilter 使用指南 |
| BlendMode | 颜色混合 | 控制源颜色与目标颜色的混合方式 | BlendMode 使用指南 |
| PathEffect | 路径变换 | 对 Path 进行虚线、圆角、裁剪等变换 | PathEffect 使用指南 |
注意:PathEffect 不通过 Paint 挂载,而是直接作用于 Path 对象。
6.1 Shader —— 颜色生成器
Shader 定义了绘制时的颜色来源,可以是纯色、渐变或图像纹理。当 Paint 设置了 Shader 时,Shader 的颜色会替代 paint.setColor() 设置的颜色。
Shader 工厂方法一览:
| 方法 | 说明 |
|---|---|
MakeColorShader(color) | 纯色着色器 |
MakeImageShader(image, tileModeX, tileModeY, sampling) | 图像着色器 |
MakeLinearGradient(start, end, colors, positions) | 线性渐变 |
MakeRadialGradient(center, radius, colors, positions) | 径向渐变 |
MakeConicGradient(center, startAngle, endAngle, colors, positions) | 锥形渐变 |
MakeDiamondGradient(center, radius, colors, positions) | 菱形渐变 |
MakeBlend(mode, dst, src) | 混合两个 Shader |
int main() {
    Paint paint;

    // 线性渐变
    std::vector<Color> colors = {Color::Red(), Color::Blue()};
    auto gradient = Shader::MakeLinearGradient(
        Point::Make(0, 0), Point::Make(200, 0), colors);
    paint.setShader(gradient);

    canvas->drawRect(Rect::MakeXYWH(50, 50, 200, 100), paint);
}
6.2 ColorFilter —— 颜色变换
ColorFilter 对绘制颜色进行变换,如色彩矩阵、混合色、亮度提取等。
ColorFilter 工厂方法一览:
| 方法 | 说明 |
|---|---|
Matrix(rowMajor) | 4x5 颜色矩阵变换 |
Blend(color, mode) | 将常量颜色与输入颜色混合 |
Luma() | 提取亮度(转为灰度) |
AlphaThreshold(threshold) | Alpha 阈值滤镜,低于阈值变透明,否则变不透明 |
Compose(inner, outer) | 组合两个 ColorFilter(先应用 inner,再应用 outer) |
int main() {
    Paint paint;

    // 灰度滤镜(使用颜色矩阵)
    std::array<float, 20> grayscale = {
        0.299f, 0.587f, 0.114f, 0, 0,
        0.299f, 0.587f, 0.114f, 0, 0,
        0.299f, 0.587f, 0.114f, 0, 0,
        0,      0,      0,      1, 0
    };
    paint.setColorFilter(ColorFilter::Matrix(grayscale));

    canvas->drawImage(image, 0, 0, paint);
}
6.3 MaskFilter —— Alpha 蒙版
MaskFilter 对绘制内容的 Alpha 通道进行调制。最常见的用法是通过 MakeShader() 使用 Shader 的 Alpha 通道作为蒙版。
int main() {
    Paint paint;

    // 使用渐变作为蒙版
    std::vector<Color> colors = {Color::White(), Color::Transparent()};
    auto gradientShader = Shader::MakeLinearGradient(
        Point::Make(0, 0), Point::Make(200, 0), colors);
    paint.setMaskFilter(MaskFilter::MakeShader(gradientShader));

    canvas->drawRect(Rect::MakeXYWH(50, 50, 200, 100), paint);
}
6.4 ImageFilter —— 离屏后处理
ImageFilter 将绘制内容先渲染到离屏纹理,然后进行模糊、阴影等后处理。
ImageFilter 工厂方法一览:
| 方法 | 说明 |
|---|---|
Blur(blurrinessX, blurrinessY, tileMode) | 高斯模糊 |
DropShadow(dx, dy, blurX, blurY, color) | 外阴影(包含原内容) |
DropShadowOnly(dx, dy, blurX, blurY, color) | 仅外阴影(不含原内容) |
InnerShadow(dx, dy, blurX, blurY, color) | 内阴影(包含原内容) |
InnerShadowOnly(dx, dy, blurX, blurY, color) | 仅内阴影(不含原内容) |
ColorFilter(colorFilter) | 将 ColorFilter 作为 ImageFilter 使用 |
Runtime(effect) | 自定义 RuntimeEffect 滤镜 |
Compose(inner, outer) | 组合两个 ImageFilter |
Compose(filters) | 按顺序组合多个 ImageFilter |
int main() {
    Paint paint;

    // 高斯模糊
    paint.setImageFilter(ImageFilter::Blur(10.0f, 10.0f));
    canvas->drawImage(image, 50, 50, paint);

    // 投影
    paint.setImageFilter(ImageFilter::DropShadow(5, 5, 10, 10, Color::Black()));
    canvas->drawRect(Rect::MakeXYWH(50, 200, 150, 100), paint);
}
6.5 BlendMode —— 颜色混合
BlendMode 控制源颜色(绘制内容)与目标颜色(已有像素)的混合方式。常用模式包括 Multiply(正片叠底)、Screen(滤色)等。
Paint paint;

paint.setBlendMode(BlendMode::Multiply);  // 正片叠底
canvas->drawImage(overlayImage, 0, 0, paint);

paint.setBlendMode(BlendMode::Screen);  // 滤色
canvas->drawImage(overlayImage, 200, 0, paint);
6.6 PathEffect —— 路径变换
PathEffect 直接作用于 Path,不通过 Paint 挂载。常用于虚线、圆角等效果。
以下示例使用 MakeDash() 创建虚线效果,参数为间隔数组和起始偏移:
Path path;
path.moveTo(50, 100);
path.lineTo(250, 100);

float intervals[] = {10, 5};  // 10px 实线,5px 间隔
auto dashEffect = PathEffect::MakeDash(intervals, 2, 0);
dashEffect->filterPath(&path);

Paint paint;
paint.setStyle(PaintStyle::Stroke);
paint.setStrokeWidth(2.0f);
canvas->drawPath(path, paint);
7. 其他方法
7.1 reset() —— 重置 Paint
reset() 将 Paint 的所有属性恢复为默认值,等价于重新构造一个新的 Paint 对象。
重置后的默认状态:color 为白色、style 为 Fill、strokeWidth 为 1.0、antiAlias 为 true、blendMode 为 SrcOver,所有滤镜(shader、imageFilter 等)均为 nullptr。
Paint paint;
paint.setColor(Color::Red());
paint.setStyle(PaintStyle::Stroke);
paint.setStrokeWidth(5.0f);
paint.setImageFilter(ImageFilter::Blur(10, 10));

paint.reset();  // 恢复为默认状态
7.2 Brush 访问与变换
getBrush() 返回 Paint 内部的 Brush 对象引用,包含所有外观属性(color、shader、blendMode、colorFilter、maskFilter)。
Paint paint;
paint.setColor(Color::Blue());
paint.setShader(someShader);
paint.setBlendMode(BlendMode::Multiply);

const Brush& brush = paint.getBrush();
Brush.makeWithMatrix() 对 Brush 内部的 Shader 和 MaskFilter 应用指定的矩阵变换,常用于坐标空间转换:
Brush brush;
brush.shader = Shader::MakeImageShader(image);

Matrix scale = Matrix::MakeScale(2.0f, 2.0f);
Brush scaledBrush = brush.makeWithMatrix(scale);  // Shader 坐标系缩放 2 倍
附录:快速参考
Paint 方法速查表
| 分类 | 方法 |
|---|---|
| 颜色 | getColor, setColor, getAlpha, setAlpha |
| 样式 | getStyle, setStyle |
| 描边 | getStrokeWidth, setStrokeWidth, getLineCap, setLineCap |
| 描边 | getLineJoin, setLineJoin, getMiterLimit, setMiterLimit, getStroke, setStroke |
| 效果 | getShader, setShader, getMaskFilter, setMaskFilter |
| 效果 | getColorFilter, setColorFilter, getBlendMode, setBlendMode, getImageFilter, setImageFilter |
| 其他 | isAntiAlias, setAntiAlias, getBrush, reset |
默认值速查表
| 属性 | 默认值 |
|---|---|
| color | White (1, 1, 1, 1) |
| style | PaintStyle::Fill |
| strokeWidth | 1.0 |
| lineCap | LineCap::Butt |
| lineJoin | LineJoin::Miter |
| miterLimit | 4.0 |
| antiAlias | true |
| blendMode | BlendMode::SrcOver |
| shader | nullptr |
| maskFilter | nullptr |
| colorFilter | nullptr |
| imageFilter | nullptr |
效果系统速查表
| 效果 | 挂载方式 | 作用对象 |
|---|---|---|
| Shader | paint.setShader() | 颜色来源 |
| ColorFilter | paint.setColorFilter() | 颜色变换 |
| MaskFilter | paint.setMaskFilter() | Alpha 蒙版 |
| ImageFilter | paint.setImageFilter() | 离屏后处理 |
| BlendMode | paint.setBlendMode() | 颜色混合 |
| PathEffect | effect->filterPath(&path) | Path 变换 |