文本与字体
TGFX 提供了一套完整的文本渲染 API,从最简单的一行文本绘制到复杂的多字体混排、自定义字体,均能高效支持。本文按功能场景组织,帮助你快速掌握文本渲染的核心能力。
1. Typeface 与 Font
概念与动机
在 TGFX 中,文本渲染的基石是 Typeface 和 Font 两个类:
- Typeface 代表一个字体文件(
.ttf、.otf、.ttc等)。它包含字形集合(glyph set)和布局信息,是不可变的共享对象。一个 Typeface 可以被多个 Font 共用。 - Font = Typeface + 绘制选项(字号、仿粗体、仿斜体)。Font 是一个轻量级值对象,通常在绘制调用时按需构造。
类比:Typeface 好比你安装的「思源宋体」字体文件,Font 则是「思源宋体 / 36px / 粗体」这一组具体的绘制参数。
关键 API 协作流程
字体文件 (.ttf/.otf)
       │
       ▼
  Typeface::MakeFromPath()    ← 加载字体
       │
       ▼
   Font(typeface, size)       ← 组合绘制选项
       │
       ├─▶ font.getGlyphID()  ← 字符 → 字形映射
       ├─▶ font.getAdvance()  ← 获取字形步进宽度
       ├─▶ font.getBounds()   ← 获取字形边界框
       ├─▶ font.getMetrics()  ← 获取字体度量信息
       └─▶ font.getPath()     ← 获取字形矢量轮廓
创建 Typeface
Typeface 提供多种静态工厂方法:
// 从文件路径加载(最常用)
auto typeface = Typeface::MakeFromPath("resources/font/NotoSansSC-Regular.otf");

// 从内存数据加载
auto typeface = Typeface::MakeFromBytes(data, length);

// 从 Data 对象加载
auto typeface = Typeface::MakeFromData(fontData);

// 从系统字体名查找(需要平台支持)
auto typeface = Typeface::MakeFromName("Noto Sans SC", FontStyle::Bold());

// 获取一个空字体(不含任何字形,用于占位)
auto empty = Typeface::MakeEmpty();
对于 TTC 字体集合文件(如 .ttc),通过 ttcIndex 参数指定集合中的字体索引:
// 加载 TTC 文件中第 2 个字体(索引从 0 开始)
auto typeface = Typeface::MakeFromPath("fonts/collection.ttc", 1);
查询 Typeface 信息
auto typeface = Typeface::MakeFromPath("NotoSansSC-Regular.otf");

typeface->uniqueID();      // 唯一标识符
typeface->fontFamily();    // "Noto Sans SC"
typeface->fontStyle();     // "Regular"
typeface->glyphsCount();   // 字形总数
typeface->unitsPerEm();    // 设计空间单位数(通常 1000 或 2048)
typeface->hasColor();      // 是否有彩色字形(如 emoji 字体)
typeface->hasOutlines();   // 是否有矢量轮廓(可生成 Path)
typeface->getBounds();     // 所有字形的并集边界框
构造 Font
// 基本构造
Font font(typeface, 36.0f);

// 设置仿粗体 / 仿斜体
font.setFauxBold(true);
font.setFauxItalic(true);

// 基于现有 Font 创建不同字号的副本
Font largeFont = font.makeWithSize(72.0f);
使用 Font 查询字形信息
Font font(typeface, 40.0f);

// 字符 → 字形 ID(核心映射)
GlyphID glyphID = font.getGlyphID('A');            // ASCII 字符
GlyphID glyphID = font.getGlyphID(0x4F60);         // Unicode 码点(你)
GlyphID glyphID = font.getGlyphID("😀");           // UTF-8 字形名

// 字形度量
float advance = font.getAdvance(glyphID);           // 水平步进宽度
Rect bounds = font.getBounds(glyphID);              // 字形边界框
Point offset = font.getVerticalOffset(glyphID);     // 竖排文本偏移

// 字形路径(仅矢量字体有效,彩色 emoji 返回 false)
Path path;
bool hasPath = font.getPath(glyphID, &path);
关联类型:FontStyle
FontStyle 描述字体的粗细、宽度和倾斜属性,用于系统字体查找:
// 预定义样式
FontStyle::Normal();      // Regular
FontStyle::Bold();        // Bold
FontStyle::Italic();      // Italic
FontStyle::BoldItalic();  // Bold + Italic

// 自定义样式
FontStyle style(FontWeight::SemiBold, FontWidth::Normal, FontSlant::Upright);
auto typeface = Typeface::MakeFromName("Arial", style);
FontWeight 对应 CSS font-weight:Thin(100)、Light(300)、Normal(400)、Medium(500)、Bold(700)、Black(900) 等。
FontSlant 对应 CSS font-style:Upright、Italic、Oblique。
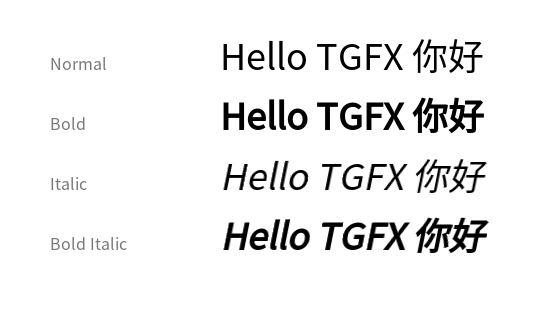
下图展示了同一字体在 Normal、Bold、Italic、Bold Italic 四种样式下的渲染效果:
关联类型:FontMetrics
FontMetrics 提供字体的全局度量信息,所有值已按字号缩放:
FontMetrics metrics = font.getMetrics();

metrics.ascent;             // 基线上方保留距离(负值)
metrics.descent;            // 基线下方保留距离(正值)
metrics.leading;            // 行间距
metrics.capHeight;          // 大写字母高度
metrics.xHeight;            // 小写 'x' 高度
metrics.underlineThickness; // 下划线粗细
metrics.underlinePosition;  // 下划线位置(相对基线)
下图展示了排版中各度量线的含义(以 "Sphinx" 为例):

图片来源:Wikimedia Commons,作者 Max Naylor,Public Domain。
- Baseline(基线):文字排列的基准线,对应
drawSimpleText中的 y 坐标 - Ascent(上升部):基线到推荐上边界的距离,对应
metrics.ascent(负值) - Cap Height(大写高度):基线到大写字母顶部的距离,对应
metrics.capHeight - x-Height(x 字高):基线到小写字母顶部的距离,对应
metrics.xHeight - Descent(下降部):基线到推荐下边界的距离,对应
metrics.descent(正值)
top和bottom是字体所有字形的最大范围,通常比ascent/descent更极端。
代码示例:加载字体并绘制
提炼自测试用例 TypefaceTest/CustomPathTypeface:
// 加载字体
auto typeface = Typeface::MakeFromPath("resources/font/NotoSansSC-Regular.otf");
Font font(typeface, 40.0f);

// 获取字形信息
auto glyphA = font.getGlyphID('A');
auto glyphB = font.getGlyphID('B');
auto glyphC = font.getGlyphID('C');

// 计算位置
float x = 50.0f;
std::vector<GlyphID> glyphs = {glyphA, glyphB, glyphC};
std::vector<Point> positions;
for (auto glyph : glyphs) {
  positions.push_back(Point::Make(x, 80.0f));
  x += font.getAdvance(glyph);
}

// 绘制
Paint paint;
paint.setColor(Color::FromRGBA(228, 63, 90));
canvas->drawGlyphs(glyphs.data(), positions.data(), glyphs.size(), font, paint);
渲染效果(NotoSansSC-Regular, 40px):
选型与对比
| 特性 | Typeface | Font |
|---|---|---|
| 语义 | 字体文件/字形集合 | 字体 + 绘制选项 |
| 可变性 | 不可变,线程安全 | 值对象,可自由修改 |
| 共享方式 | shared_ptr 多处共用 | 按值拷贝 |
| 创建开销 | 较高(需解析字体文件) | 极低(仅组合参数) |
何时用 Font::setFauxBold() vs 真正的 Bold 字体?
- 如果有对应的 Bold 字体文件(如
NotoSans-Bold.ttf),优先加载它,效果更好。 setFauxBold(true)通过加粗描边仿粗体,适合没有 Bold 变体时的降级方案。setFauxItalic(true)同理,通过 skew 矩阵仿斜体。
注意事项与陷阱
- Typeface 创建失败:
MakeFromPath等方法在路径无效或字体文件损坏时返回nullptr,务必检查返回值。 - GlyphID 为 0:
getGlyphID()返回 0 表示该字符在当前字体中没有对应字形。TGFX 不内置字体 fallback 机制,需要自行处理(参见高级 APITextLayer或TextShaper)。 - 彩色字体 vs 矢量字体:
hasColor()和hasOutlines()不互斥。普通字体通常hasOutlines()=true, hasColor()=false;彩色 emoji 字体通常hasColor()=true, hasOutlines()=false。font.getPath()对彩色字体返回false。 - unitsPerEm:字体的设计空间坐标系。所有度量值在内部以
unitsPerEm为单位存储,通过fontSize / unitsPerEm缩放到像素空间。自定义字体创建时需注意此值(详见第 5 节)。
2. 简单文本:drawSimpleText
概念与动机
drawSimpleText 是 Canvas 上最轻量的文本绘制方法。它接受一个 UTF-8 字符串,使用 Typeface 内置的字符到字形映射(cmap),按默认步进宽度排列字形——无需手动获取 GlyphID 或计算位置。
适合场景:快速绘制短文本(标签、标题、调试信息),对排版精度要求不高。
关键 API
void Canvas::drawSimpleText(const std::string& text, float x, float y,
                            const Font& font, const Paint& paint);
参数说明:
text:UTF-8 编码字符串(x, y):首个字形的基线起点font:字体 + 大小paint:颜色、样式(填充/描边)、混合模式等
代码示例:基础文本绘制
提炼自测试用例 TextBlobPositioningRender:
auto typeface = Typeface::MakeFromPath("resources/font/NotoSansSC-Regular.otf");
Font font(typeface, 30.0f);

Paint paint;
paint.setColor(Color::Black());

// 一行代码绘制文本
canvas->drawSimpleText("Hello, TGFX!", 50.0f, 80.0f, font, paint);
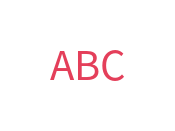
代码示例:描边文本
提炼自测试用例 TextBlobWithStroke:
Font font(typeface, 60.0f);
Paint strokePaint;
strokePaint.setColor(Color::Blue());
strokePaint.setStyle(PaintStyle::Stroke);
strokePaint.setStrokeWidth(3.0f);

// 先画描边
canvas->drawSimpleText("TGFX", 50.0f, 80.0f, font, strokePaint);
// 再画填充(叠加在描边上)
Paint fillPaint;
fillPaint.setColor(Color::FromRGBA(255, 200, 100, 255));
canvas->drawSimpleText("TGFX", 50.0f, 80.0f, font, fillPaint);
渲染效果:
注意事项与陷阱
- 无字体 Fallback:如果文本中包含当前字体不支持的字符(如中文字体遇到 emoji),这些字符会被跳过(GlyphID 为 0),不会自动切换到其他字体。需要混合字体渲染时,应使用
TextBlob或TextBlobBuilder。 - 无复杂排版:
drawSimpleText不支持连字(ligature)、字距调整(kerning)、双向文本等高级排版功能。如需这些特性,应使用TextShaper进行 shaping 后再通过drawGlyphs绘制。 - 不可缓存:每次调用
drawSimpleText都会重新执行字符到字形的映射。如果同一文本需要反复绘制(如每帧),建议先创建TextBlob然后复用。 - 坐标是基线位置:
(x, y)指的是文本基线(baseline)的起点,不是左上角。文本会从基线向上延伸ascent高度,向下延伸descent高度。
3. TextBlob
概念与动机
TextBlob 是不可变的文本运行容器。它将字形 ID、位置数据和字体信息打包存储在一块连续内存中,一旦创建便不可修改。这种设计带来两个核心优势:
- 高效复用:同一个 TextBlob 可以多次绘制,无需每帧重新计算字形布局。
- 紧凑内存:所有数据存储在单一内存块中,对 CPU 缓存友好。
TextBlob 支持多种字形定位模式——从最简单的水平排列到带旋转缩放的复杂变换——以满足不同场景需求。
关键 API 协作流程
创建 TextBlob(四种方式)
       │
       ├─ MakeFrom(text, font)         ← 从 UTF-8 文本
       ├─ MakeFrom(glyphs, positions)  ← 从字形+位置
       ├─ MakeFromPosH(...)            ← 水平定位
       └─ MakeFromRSXform(...)         ← 旋转+缩放
       │
       ▼
  TextBlob 对象(不可变)
       │
       ├─▶ canvas->drawTextBlob(blob, x, y, paint)  ← 绘制
       ├─▶ blob->getBounds()                          ← 保守边界框
       ├─▶ blob->getTightBounds(&matrix)              ← 精确边界框
       ├─▶ blob->hitTestPoint(x, y, &stroke)          ← 点击测试
       └─▶ for (auto run : *blob) { ... }             ← 遍历 GlyphRun
创建方式一:从 UTF-8 文本
最简单的方式,类似 drawSimpleText 但生成可复用的对象:
auto typeface = Typeface::MakeFromPath("resources/font/NotoSansSC-Regular.otf");
Font font(typeface, 40.0f);

auto blob = TextBlob::MakeFrom("Hello", font);
// blob 可以多次绘制
canvas->drawTextBlob(blob, 50.0f, 80.0f, paint);
canvas->drawTextBlob(blob, 50.0f, 160.0f, paint);
返回 nullptr 的情况:文本为空、所有字符都无法映射到字形。
创建方式二:从字形 ID + 位置
当你已经通过文本 shaping 或自定义布局获得了字形 ID 和精确位置时使用:
Font font(typeface, 40.0f);

auto glyphA = font.getGlyphID('A');
auto glyphB = font.getGlyphID('B');
auto glyphC = font.getGlyphID('C');

GlyphID glyphs[] = {glyphA, glyphB, glyphC};
Point positions[] = {{0, 0}, {50, 10}, {100, 20}};  // 每个字形独立 (x, y)

auto blob = TextBlob::MakeFrom(glyphs, positions, 3, font);
创建方式三:水平定位(MakeFromPosH)
所有字形共享同一 y 坐标,每个字形有独立的 x 位置。比 Point 定位节省一半位置数据:
GlyphID glyphs[] = {glyphA, glyphB, glyphC};
float xPositions[] = {0.0f, 40.0f, 80.0f};
float y = 50.0f;

auto blob = TextBlob::MakeFromPosH(glyphs, xPositions, 3, y, font);
创建方式四:RSXform 定位
每个字形可以独立旋转、缩放和平移,适合沿曲线排列文字等场景:
GlyphID glyphs[] = {glyphA, glyphB};

RSXform xforms[] = {
    RSXform::Make(1.0f, 0.0f, 0.0f, 0.0f),     // 无旋转,原点
    RSXform::Make(0.7f, 0.7f, 50.0f, 20.0f),   // 45° 旋转 + 平移
};

auto blob = TextBlob::MakeFromRSXform(glyphs, xforms, 2, font);
边界查询
auto blob = TextBlob::MakeFrom("ABC", font);

// 保守边界框:快速但可能偏大
Rect bounds = blob->getBounds();

// 精确边界框:更准确但更耗时,可传入绘制矩阵
Rect tightBounds = blob->getTightBounds();

// 带缩放矩阵的精确边界(推荐使用最终绘制矩阵)
Matrix scaleMatrix = Matrix::MakeScale(2.0f);
Rect scaledBounds = blob->getTightBounds(&scaleMatrix);
点击测试
hitTestPoint 对每个字形使用实际路径进行精确测试,彩色字形(emoji)则使用边界框:
Font font(typeface, 80.0f);
Font emojiFont(emojiTypeface, 80.0f);

// 构建包含普通字符和 emoji 的 TextBlob
TextBlobBuilder builder;
// ...(构建过程见 TextBlobBuilder 章节)
auto blob = builder.build();

// 测试某个点是否命中字形
bool hit = blob->hitTestPoint(localX, localY);

// 带描边扩展的测试(扩大命中区域)
Stroke stroke;
stroke.width = 20.0f;
bool hitWithStroke = blob->hitTestPoint(localX, localY, &stroke);
对于字母 "O" 这样有镂空区域的字形,中心点不会命中(因为使用实际路径测试)。而 emoji 使用边界框测试,内部任意点都会命中。
遍历 GlyphRun
TextBlob 支持范围 for 循环迭代内部的 GlyphRun:
for (const auto& run : *blob) {
    const Font& font = run.font;
    size_t count = run.glyphCount;
    GlyphPositioning mode = run.positioning;

    for (size_t i = 0; i < count; ++i) {
        GlyphID glyph = run.glyphs[i];
        // 根据 positioning 模式读取位置数据
    }
}
关联类型:GlyphRun 与 GlyphPositioning
GlyphRun 表示 TextBlob 中共享同一字体和定位模式的一段连续字形序列:
| 字段 | 类型 | 说明 |
|---|---|---|
font | Font | 该 run 使用的字体 |
glyphCount | size_t | 字形数量 |
glyphs | const GlyphID* | 字形 ID 数组 |
positioning | GlyphPositioning | 定位模式 |
positions | const float* | 原始位置数据 |
offsetY | float | Horizontal 模式的共享 y 偏移 |
GlyphPositioning 枚举定义了五种定位模式:
| 模式 | 每字形浮点数 | 说明 |
|---|---|---|
Default | 0 | 按默认步进排列(迭代时自动展开为 Horizontal) |
Horizontal | 1 | 每字形一个 x 坐标,共享 y |
Point | 2 | 每字形独立 (x, y) |
RSXform | 4 | 每字形旋转+缩放+平移 (scos, ssin, tx, ty) |
Matrix | 6 | 每字形完整 2D 仿射矩阵 |
关联类型:RSXform
RSXform 是旋转+缩放矩阵的压缩形式,变换矩阵为:
| scos  -ssin   tx |
| ssin   scos   ty |
|   0      0     1 |
其中 scos = scale × cos(angle),ssin = scale × sin(angle)。
两种创建方式:
// 直接指定参数
RSXform xform = RSXform::Make(scos, ssin, tx, ty);

// 从角度和锚点创建(更直观)
RSXform xform = RSXform::MakeFromRadians(
    scale,    // 缩放比例
    radians,  // 旋转角度(弧度)
    tx, ty,   // 锚点变换后的位置
    ax, ay    // 源空间中的锚点坐标
);
代码示例:RSXform 沿弧线排列文字
提炼自测试用例 TextBlobWithRSXform:
auto typeface = Typeface::MakeFromPath("resources/font/NotoSansSC-Regular.otf");
Font font(typeface, 32.0f);

// 获取字形和 advance
std::string text = "HELLO TGFX";
auto glyphCount = text.size();
std::vector<GlyphID> glyphs(glyphCount);
std::vector<float> advances(glyphCount);
for (size_t i = 0; i < glyphCount; i++) {
  glyphs[i] = font.getGlyphID(text[i]);
  advances[i] = font.getAdvance(glyphs[i]);
}

// 沿弧线排列:每个字形按切线方向旋转
float radius = 120.0f;
float centerX = 180.0f;
float centerY = 180.0f;
float startAngle = -M_PI * 0.75f;

std::vector<RSXform> xforms(glyphCount);
float currentAngle = startAngle;
for (size_t i = 0; i < glyphCount; i++) {
  float halfAdvance = advances[i] * 0.5f;
  float midAngle = currentAngle + halfAdvance / radius;
  float x = centerX + radius * cosf(midAngle);
  float y = centerY + radius * sinf(midAngle);
  float tangent = midAngle + M_PI * 0.5f;
  xforms[i] = RSXform::MakeFromRadians(1.0f, tangent, x, y, halfAdvance, 0);
  currentAngle += advances[i] / radius;
}

auto blob = TextBlob::MakeFromRSXform(glyphs.data(), xforms.data(), glyphCount, font);

// 绘制基线弧线(浅灰色)
float endAngle = currentAngle;
float arcMargin = 5.0f / radius;
float drawStart = (startAngle - arcMargin) * 180.0f / M_PI;
float drawEnd = (endAngle + arcMargin) * 180.0f / M_PI;
Rect oval = Rect::MakeXYWH(centerX - radius, centerY - radius, radius * 2, radius * 2);
Path arcPath;
arcPath.addArc(oval, drawStart, drawEnd - drawStart);
Paint arcPaint;
arcPaint.setColor(Color::FromRGBA(255, 127, 80));
arcPaint.setStyle(PaintStyle::Stroke);
arcPaint.setStrokeWidth(1.0f);
canvas->drawPath(arcPath, arcPaint);

// 绘制文字
Paint paint;
paint.setColor(Color::FromRGBA(52, 120, 198));
canvas->drawTextBlob(blob, 0, 0, paint);
渲染效果(珊瑚红弧线为基线路径):
选型与对比
drawSimpleText | TextBlob::MakeFrom(text) | TextBlob::MakeFrom(glyphs, positions) | |
|---|---|---|---|
| 输入 | UTF-8 字符串 | UTF-8 字符串 | 字形 ID + 位置数组 |
| 是否可复用 | 否(每次重新映射) | 是 | 是 |
| 字形定位 | 默认步进 | 默认步进 | 完全自定义 |
| 多字体支持 | 否 | 否 | 否(需用 TextBlobBuilder) |
| 适用场景 | 快速绘制一次性文本 | 反复绘制同一文本 | 自定义布局排版 |
注意事项与陷阱
- getBounds vs getTightBounds:
getBounds()是保守估计(快但可能偏大),getTightBounds()基于实际字形路径计算(准但慢)。在动画帧中若只需粗略裁剪判断,用getBounds();需要精确布局时用getTightBounds()。 - hitTestPoint 对彩色字形使用边界框:emoji 等彩色字形没有矢量轮廓,因此点击测试使用边界框而非路径。这意味着 emoji 的任何位置点击都会命中,而矢量字形的镂空区域(如 "O" 的中心)不会命中。
- TextBlob 不可修改:创建后无法增删字形或改变位置。如需动态修改,应重新创建 TextBlob。
- RSXform 的 MakeFromRadians:
(ax, ay)是源空间中的锚点像素坐标,不是归一化值。通常设为字形边界框的中心以实现绕中心旋转。
4. TextBlobBuilder
概念与动机
TextBlobBuilder 用于构建包含多个 run(段)的复杂 TextBlob。每个 run 可以使用不同的字体和定位模式,适合:
- 混合字体渲染(如中文 + emoji + 英文使用不同 Typeface)
- 自定义每段文本的定位方式
- 富文本排版(不同字号、样式的文本段落)
Builder 采用零拷贝设计:分配 run 时直接返回存储指针,调用者直接向缓冲区写入数据,避免额外的内存拷贝。
关键 API 协作流程
TextBlobBuilder builder;
       │
       ├─ allocRunPosH(font, count, y)    ← 分配水平定位 run
       │     └─ 填充 buffer.glyphs[] 和 buffer.positions[]
       │
       ├─ allocRunPos(font, count)         ← 分配点定位 run
       │     └─ 填充 buffer.glyphs[] 和 buffer.positions[](x,y 交替)
       │
       ├─ allocRunRSXform(font, count)     ← 分配 RSXform 定位 run
       │     └─ 填充 buffer.glyphs[] 和 buffer.positions[](4 floats/glyph)
       │
       ├─ allocRunMatrix(font, count)      ← 分配矩阵定位 run
       │     └─ 填充 buffer.glyphs[] 和 buffer.positions[](6 floats/glyph)
       │
       ├─ allocRun(font, count, x, y)      ← 分配默认定位 run
       │     └─ 仅填充 buffer.glyphs[](位置自动计算)
       │
       └─▶ builder.build()                 ← 生成不可变 TextBlob
               │                              (builder 自动重置,可复用)
               ▼
          TextBlob 对象
RunBuffer 结构
struct RunBuffer {
    GlyphID* glyphs;    // 字形 ID 存储指针
    float* positions;    // 位置数据存储指针(不同模式含义不同)
};
positions 的内存布局取决于分配方式:
| 分配方法 | positions 布局 | 每字形 float 数 |
|---|---|---|
allocRun | nullptr | 0(按默认步进) |
allocRunPosH | [x0, x1, x2, ...] | 1 |
allocRunPos | [x0, y0, x1, y1, ...] | 2 |
allocRunRSXform | [scos0, ssin0, tx0, ty0, ...] | 4 |
allocRunMatrix | [sx0, kx0, tx0, ky0, sy0, ty0, ...] | 6 |
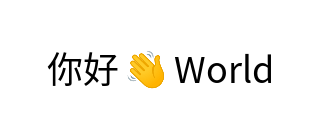
代码示例:多字体混排
提炼自测试用例 TextBlobMixedPositioning——中文 + emoji + 英文混排:
auto typeface = Typeface::MakeFromPath("resources/font/NotoSansSC-Regular.otf");
auto emojiTypeface = Typeface::MakeFromPath("resources/font/NotoColorEmoji.ttf");

Font font(typeface, 36.0f);
Font emojiFont(emojiTypeface, 36.0f);

auto glyphNi = font.getGlyphID(0x4F60);           // 你
auto glyphHao = font.getGlyphID(0x597D);          // 好
auto glyphEmoji = emojiFont.getGlyphID(0x1F44B);  // 👋
auto glyphW = font.getGlyphID('W');
auto glyphO = font.getGlyphID('o');
auto glyphR = font.getGlyphID('r');
auto glyphL = font.getGlyphID('l');
auto glyphD = font.getGlyphID('d');

TextBlobBuilder builder;
float x = 47.0f;
float y = 83.0f;

// Run 1: "你好" — 水平定位,使用中文字体
const auto& buffer1 = builder.allocRunPosH(font, 2, y);
buffer1.glyphs[0] = glyphNi;
buffer1.glyphs[1] = glyphHao;
buffer1.positions[0] = x;
buffer1.positions[1] = x + font.getAdvance(glyphNi);
x += font.getAdvance(glyphNi) + font.getAdvance(glyphHao) + 5.0f;

// Run 2: 👋 — 点定位,使用 emoji 字体
const auto& buffer2 = builder.allocRunPos(emojiFont, 1);
buffer2.glyphs[0] = glyphEmoji;
buffer2.positions[0] = x;
buffer2.positions[1] = y;
x += emojiFont.getAdvance(glyphEmoji) + 5.0f;

// Run 3: "World" — 水平定位,使用英文字体
const auto& buffer3 = builder.allocRunPosH(font, 5, y);
buffer3.glyphs[0] = glyphW;
buffer3.glyphs[1] = glyphO;
buffer3.glyphs[2] = glyphR;
buffer3.glyphs[3] = glyphL;
buffer3.glyphs[4] = glyphD;
float runX = x;
for (int i = 0; i < 5; i++) {
    buffer3.positions[i] = runX;
    runX += font.getAdvance(buffer3.glyphs[i]);
}

auto blob = builder.build();  // 生成 TextBlob

Paint paint;
paint.setColor(Color::Black());
canvas->drawTextBlob(blob, 0, 0, paint);
渲染效果:
代码示例:五种定位模式对比
提炼自测试用例 TextBlobPositioningRender:
Font font(typeface, 30.0f);
auto glyphA = font.getGlyphID('A');
auto glyphB = font.getGlyphID('B');
auto glyphC = font.getGlyphID('C');
auto glyphD = font.getGlyphID('D');

float y = 72.0f;
float spacing = 70.0f;

// 1. Default:使用字体默认 advance 排列,等同于普通水平文本
{
    TextBlobBuilder builder;
    const auto& buffer = builder.allocRunPosH(font, 4, y);
    buffer.glyphs[0] = glyphA;
    buffer.glyphs[1] = glyphB;
    buffer.glyphs[2] = glyphC;
    buffer.glyphs[3] = glyphD;
    float x = 139.0f;
    buffer.positions[0] = x;
    x += font.getAdvance(glyphA);
    buffer.positions[1] = x;
    x += font.getAdvance(glyphB);
    buffer.positions[2] = x;
    x += font.getAdvance(glyphC);
    buffer.positions[3] = x;
    auto blob = builder.build();
    canvas->drawTextBlob(blob, 0, 0, paint);
}
y += spacing;

// 2. Horizontal:共享 y,自定义 x 间距
{
    TextBlobBuilder builder;
    const auto& buffer = builder.allocRunPosH(font, 4, y);
    buffer.glyphs[0] = glyphA;
    buffer.glyphs[1] = glyphB;
    buffer.glyphs[2] = glyphC;
    buffer.glyphs[3] = glyphD;
    buffer.positions[0] = 139.0f;
    buffer.positions[1] = 179.0f;
    buffer.positions[2] = 239.0f;
    buffer.positions[3] = 319.0f;  // 自定义间距
    auto blob = builder.build();
    canvas->drawTextBlob(blob, 0, 0, paint);
}
y += spacing;

// 3. Point:每个字形独立 (x, y),可实现波浪效果
{
    TextBlobBuilder builder;
    const auto& buffer = builder.allocRunPos(font, 4);
    buffer.glyphs[0] = glyphA;
    buffer.glyphs[1] = glyphB;
    buffer.glyphs[2] = glyphC;
    buffer.glyphs[3] = glyphD;
    // x, y 交替存储
    buffer.positions[0] = 139.0f;  buffer.positions[1] = y;            // A
    buffer.positions[2] = 189.0f;  buffer.positions[3] = y - 15.0f;    // B(上移)
    buffer.positions[4] = 239.0f;  buffer.positions[5] = y + 15.0f;    // C(下移)
    buffer.positions[6] = 289.0f;  buffer.positions[7] = y;            // D
    auto blob = builder.build();
    canvas->drawTextBlob(blob, 0, 0, paint);
}
y += spacing;

// 4. RSXform:每个字形旋转不同角度(围绕字形中心)
{
    GlyphID glyphs[] = {glyphA, glyphB, glyphC, glyphD};
    float angles[] = {0.0f, 30.0f, 60.0f, 90.0f};
    float xPositions[] = {139.0f, 189.0f, 239.0f, 289.0f};

    TextBlobBuilder builder;
    const auto& buffer = builder.allocRunRSXform(font, 4);
    for (int i = 0; i < 4; i++) {
        buffer.glyphs[i] = glyphs[i];
        auto bounds = font.getBounds(glyphs[i]);
        float cx = bounds.centerX();
        float cy = bounds.centerY();
        float rad = angles[i] * M_PI / 180.0f;
        float scos = cosf(rad);
        float ssin = sinf(rad);
        float targetCenterX = xPositions[i] + cx;
        float targetCenterY = y + cy;
        float tx = targetCenterX - (scos * cx - ssin * cy);
        float ty = targetCenterY - (ssin * cx + scos * cy);
        reinterpret_cast<RSXform*>(buffer.positions)[i] =
            RSXform::Make(scos, ssin, tx, ty);
    }
    auto blob = builder.build();
    canvas->drawTextBlob(blob, 0, 0, paint);
}
y += spacing;

// 5. Matrix:每个字形独立 2x3 仿射矩阵(缩放、倾斜、旋转)
{
    TextBlobBuilder builder;
    const auto& buffer = builder.allocRunMatrix(font, 4);
    buffer.glyphs[0] = glyphA;
    buffer.glyphs[1] = glyphB;
    buffer.glyphs[2] = glyphC;
    buffer.glyphs[3] = glyphD;
    // 每个字形 6 个浮点数:scaleX, skewX, transX, skewY, scaleY, transY

    // A: 正常
    buffer.positions[0] = 1.0f;    buffer.positions[1] = 0.0f;
    buffer.positions[2] = 139.0f;  buffer.positions[3] = 0.0f;
    buffer.positions[4] = 1.0f;    buffer.positions[5] = y;

    // B: 1.5 倍缩放
    buffer.positions[6] = 1.5f;    buffer.positions[7] = 0.0f;
    buffer.positions[8] = 189.0f;  buffer.positions[9] = 0.0f;
    buffer.positions[10] = 1.5f;   buffer.positions[11] = y;

    // C: 倾斜(skewX = 0.3)
    buffer.positions[12] = 1.0f;   buffer.positions[13] = 0.3f;
    buffer.positions[14] = 249.0f; buffer.positions[15] = 0.0f;
    buffer.positions[16] = 1.0f;   buffer.positions[17] = y;

    // D: 绕字形中心旋转 45°
    {
        auto bounds = font.getBounds(glyphD);
        float cx = bounds.centerX();
        float cy = bounds.centerY();
        float angle = 45.0f * M_PI / 180.0f;
        float cosA = cosf(angle);
        float sinA = sinf(angle);
        // M = T(targetX+cx, y+cy) · R(angle) · T(-cx, -cy)
        buffer.positions[18] = cosA;
        buffer.positions[19] = -sinA;
        buffer.positions[20] = 309.0f + cx - cosA * cx + sinA * cy;
        buffer.positions[21] = sinA;
        buffer.positions[22] = cosA;
        buffer.positions[23] = y + cy - sinA * cx - cosA * cy;
    }
    auto blob = builder.build();
    canvas->drawTextBlob(blob, 0, 0, paint);
}
渲染效果(五种定位模式:Default / Horizontal / Point / RSXform / Matrix):

Builder 复用
调用 build() 后 builder 自动重置,可以立即开始构建下一个 TextBlob:
TextBlobBuilder builder;

// 第一次构建
const auto& buf1 = builder.allocRunPos(font, 1);
buf1.glyphs[0] = glyphA;
buf1.positions[0] = 0.0f;
buf1.positions[1] = 0.0f;
auto blob1 = builder.build();  // builder 自动重置

// 第二次构建(复用同一个 builder)
const auto& buf2 = builder.allocRunPos(font, 1);
buf2.glyphs[0] = glyphB;
buf2.positions[0] = 0.0f;
buf2.positions[1] = 0.0f;
auto blob2 = builder.build();  // blob1 和 blob2 完全独立
自定义边界框
如果调用者已知 TextBlob 的边界框(例如从排版引擎获得),可以通过 setBounds 跳过自动计算:
TextBlobBuilder builder;
const auto& buffer = builder.allocRunPos(font, 1);
buffer.glyphs[0] = glyphA;
buffer.positions[0] = 10.0f;
buffer.positions[1] = 20.0f;

// 设置预计算的边界框(跳过自动计算,提升性能)
builder.setBounds(Rect::MakeXYWH(0, 0, 200, 100));

auto blob = builder.build();
// blob->getBounds() 将返回 {0, 0, 200, 100}
选型与对比
TextBlob::MakeFrom 系列 | TextBlobBuilder | |
|---|---|---|
| 适用场景 | 单字体、单定位模式 | 多字体、混合定位模式 |
| Run 数量 | 始终 1 个 | 任意多个 |
| 易用性 | 一行代码 | 需要手动填充缓冲区 |
| 性能 | 适合简单场景 | 零拷贝设计,大量文本时更高效 |
注意事项与陷阱
- 空 build 返回 nullptr:如果没有调用任何
allocRun*就调用build(),返回nullptr。 - positions 是原始浮点数组:不同定位模式下,
positions的含义不同。对于 RSXform 模式,需要reinterpret_cast<RSXform*>(buffer.positions)进行类型转换后写入。 - 不可拷贝:TextBlobBuilder 禁止拷贝(
= delete),只能移动或就地使用。 - glyphCount 不能为 0:
allocRun*(font, 0)的行为未定义,应该确保至少有一个字形。
5. CustomTypeface:自定义字体
概念与动机
有时你需要使用非标准字体文件中的字形——例如用矢量路径定义自己的图标字体,或用图片作为字形。TGFX 提供了 CustomTypefaceBuilder 体系,让你可以:
- PathTypefaceBuilder:用矢量路径(Path)描述每个字形的轮廓
- ImageTypefaceBuilder:用图片(ImageCodec)作为每个字形的渲染内容
创建出的自定义 Typeface 与普通字体使用方式完全一致——可以放入 Font,然后通过 drawGlyphs 或 TextBlob 绘制。
关键 API 协作流程
选择 Builder 类型
       │
       ├─ PathTypefaceBuilder(unitsPerEm)
       │     ├─ setFontName(family, style)
       │     ├─ setMetrics(metrics)
       │     ├─ addGlyph(path, advance) → GlyphID    ← 逐个添加字形
       │     └─ detach() → Typeface                   ← 生成 Typeface
       │
       └─ ImageTypefaceBuilder(unitsPerEm)
             ├─ setFontName(family, style)
             ├─ setMetrics(metrics)
             ├─ addGlyph(image, offset, advance) → GlyphID
             └─ detach() → Typeface
       │
       ▼
  Font(customTypeface, fontSize)  ← 像普通字体一样使用
       │
       ▼
  canvas->drawGlyphs(...)
unitsPerEm 的含义
unitsPerEm 是自定义字体设计空间的坐标范围。渲染时所有数据按 fontSize / unitsPerEm 缩放到像素空间。
| unitsPerEm | 路径坐标空间 | fontSize=50 时的缩放 |
|---|---|---|
| 1(默认) | 归一化坐标 | 50× |
| 25 | 25×25 设计空间 | 2× |
| 200 | 200×200 设计空间 | 0.25× |
| 1000 | 标准字体设计空间 | 0.05× |
代码示例:路径字体
提炼自测试用例 CustomPathTypeface——用三角形、正方形、圆形作为字形:
// 路径设计在 25×25 坐标空间中
PathTypefaceBuilder builder(25);
builder.setFontName("customPath", "customStyle");

// 字形 1:三角形
Path triangle;
triangle.moveTo(Point::Make(12.5f, 2.5f));
triangle.lineTo(Point::Make(22.5f, 22.5f));
triangle.lineTo(Point::Make(2.5f, 22.5f));
triangle.close();
GlyphID g1 = builder.addGlyph(triangle, 25.0f);  // 返回 GlyphID = 1

// 字形 2:正方形
Path square;
square.moveTo(Point::Make(2.5f, 2.5f));
square.lineTo(Point::Make(22.5f, 2.5f));
square.lineTo(Point::Make(22.5f, 22.5f));
square.lineTo(Point::Make(2.5f, 22.5f));
square.close();
GlyphID g2 = builder.addGlyph(square, 25.0f);     // 返回 GlyphID = 2

// 字形 3:圆形
Path circle;
circle.addOval(Rect::MakeXYWH(2.5f, 2.5f, 20.0f, 20.0f));
circle.close();
GlyphID g3 = builder.addGlyph(circle, 25.0f);     // 返回 GlyphID = 3

// 生成 Typeface
auto typeface = builder.detach();
// typeface->hasOutlines() == true
// typeface->hasColor() == false
// typeface->glyphsCount() == 3

// 使用:fontSize=50, unitsPerEm=25 → 缩放 2× → 字形渲染为 50×50 像素
Font font(typeface, 50.0f);
font.setFauxBold(true);  // 仿粗体也能正常工作

std::vector<GlyphID> glyphs = {1, 2, 3};
std::vector<Point> positions = {{45, 50}, {105, 50}, {165, 50}};

Paint paint;
paint.setColor(Color::Red());
canvas->drawGlyphs(glyphs.data(), positions.data(), glyphs.size(), font, paint);
渲染效果:
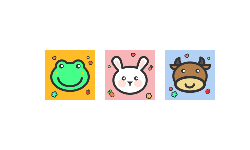
代码示例:图片字体
提炼自测试用例 CustomImageTypeface——用 PNG 图片作为字形:
// 图片为 200×200 像素,设置 unitsPerEm=200 匹配
ImageTypefaceBuilder builder(200);
builder.setFontName("customImage", "customStyle");

// 添加图片字形
auto image1 = ImageCodec::MakeFrom("resources/assets/glyph1.png");
builder.addGlyph(std::move(image1), Point::Make(0, 0), 200.0f);

auto image2 = ImageCodec::MakeFrom("resources/assets/glyph2.png");
builder.addGlyph(std::move(image2), Point::Make(0, 0), 200.0f);

auto typeface = builder.detach();
// typeface->hasColor() == true
// typeface->hasOutlines() == false

// fontSize=50, unitsPerEm=200 → 缩放 0.25× → 200×200 图片渲染为 50×50 像素
Font font(typeface, 50.0f);
std::vector<GlyphID> glyphs = {1, 2};
std::vector<Point> positions = {{45, 50}, {105, 50}};
canvas->drawGlyphs(glyphs.data(), positions.data(), glyphs.size(), font, Paint());
渲染效果:
Builder 的 detach 与追加
detach() 后 builder 仍然有效,可以继续添加字形。再次 detach() 的 Typeface 会包含之前所有字形:
ImageTypefaceBuilder builder(200);
// 添加 2 个字形
builder.addGlyph(image1, offset, 200.0f);
builder.addGlyph(image2, offset, 200.0f);
auto typeface1 = builder.detach();  // 包含 2 个字形

// 继续追加
builder.addGlyph(image3, offset, 200.0f);
auto typeface2 = builder.detach();  // 包含 3 个字形
// typeface1 仍然有效,但只有 2 个字形
同一个 builder 创建的所有 Typeface 共享内部渲染缓存,在内存使用上更高效。
延迟路径:PathProvider
对于路径字形,除了直接传入 Path 对象,还可以传入 PathProvider——一个提供路径的延迟加载接口。路径在首次渲染时才被请求:
class MyIconProvider : public PathProvider {
public:
    Path getPath() const override {
        Path path;
        // 构建路径...
        return path;
    }
    Rect getBounds() const override {
        return Rect::MakeXYWH(0, 0, 100, 100);
    }
};

builder.addGlyph(std::make_shared<MyIconProvider>(), 100.0f);
PathProvider 必须是线程安全且创建后不可变的,因为它可能从任意线程被调用。
选型与对比
| PathTypefaceBuilder | ImageTypefaceBuilder | |
|---|---|---|
| 字形类型 | 矢量路径 | 位图图片 |
hasOutlines() | true | false |
hasColor() | false | true |
| 描边支持 | ✅(路径可描边) | ❌(图片无法描边) |
| getPath() | ✅ | ❌ |
| 缩放质量 | 无损(矢量) | 可能模糊(位图) |
| 适用场景 | 图标字体、自定义符号 | 彩色图标、贴纸字体 |
注意事项与陷阱
- GlyphID 从 1 开始:
addGlyph返回的 GlyphID 从 1 递增。0 是保留值,表示无效字形。 - 容量限制:当 builder 已满时,
addGlyph返回 0。GlyphID 是 16 位无符号整数,最大值为 65535。 - openStream 和 copyTableData 返回 nullptr:自定义字体没有底层字体文件,这些方法不可用。
- unitsPerEm 选择:如果路径是从另一个字体以 48px 大小提取的,应设置
unitsPerEm = 48。如果路径是归一化坐标(0~1),应设置unitsPerEm = 1。错误的 unitsPerEm 会导致字形显示过大或过小。 - 图片字体的 offset 参数:
addGlyph(image, offset, advance)中的offset是字形原点到图片左上角的偏移。通常设为(0, 0)意味着图片左上角就是字形原点。
6. Shape 与文本路径化
概念与动机
有时你需要把文本转换为矢量路径——例如对文字做路径运算(布尔操作、变形)、或者将文字输出到不支持文本的格式。Shape::MakeFrom 可以从 TextBlob 提取所有矢量字形的轮廓并合并为一个 Shape 对象。
关键 API
// 从 TextBlob 创建 Shape(提取所有可生成路径的字形)
static std::shared_ptr<Shape> Shape::MakeFrom(std::shared_ptr<TextBlob> textBlob);

// 从单个字形创建 Shape
static std::shared_ptr<Shape> Shape::MakeFrom(Font font, GlyphID glyphID);
代码示例
提炼自测试用例 ShapeMakeFromMixedTextBlob——混合文本转路径:
Font font(typeface, 60.0f);       // 矢量字体
Font emojiFont(emojiTypeface, 60.0f);  // 彩色 emoji 字体

// 构建包含 "AB😀CD" 的 TextBlob
TextBlobBuilder builder;
// ...(添加 A、B 用矢量字体,😀 用 emoji 字体,C、D 用矢量字体)
auto textBlob = builder.build();

// 转换为 Shape:只提取矢量字形(A、B、C、D),跳过 emoji
auto shape = Shape::MakeFrom(textBlob);
// shape 不为 nullptr(至少有矢量字形)

// 获取合并后的路径
auto path = shape->getPath();
// path 包含 A、B、C、D 的轮廓,不含 emoji

// 可以对路径做任意操作
Paint paint;
paint.setColor(Color::Black());
path.transform(Matrix::MakeTrans(0, 70.0f));
canvas->drawPath(path, paint);
注意事项与陷阱
- 彩色字形被跳过:
Shape::MakeFrom(textBlob)只提取hasOutlines()为 true 的字形。如果 TextBlob 中全部是 emoji,返回nullptr。 - 返回的是合并路径:所有字形轮廓被合并到一个 Path 中。如需分别处理各字形,应逐字形调用
Shape::MakeFrom(font, glyphID)。 - Shape 是延迟对象:
getPath()在首次调用时才实际计算路径。
附录:Canvas 上的三种文本绘制方法
| 方法 | 签名 | 说明 |
|---|---|---|
drawSimpleText | (text, x, y, font, paint) | 最简单,直接绘制 UTF-8 文本 |
drawGlyphs | (glyphs[], positions[], count, font, paint) | 逐字形绘制,完全控制位置 |
drawTextBlob | (textBlob, x, y, paint) | 绘制预构建的 TextBlob,可复用 |
选择建议:
- 一次性短文本 →
drawSimpleText - 自定义排版引擎的输出 →
drawGlyphs - 反复绘制相同文本 / 多字体混排 →
drawTextBlob